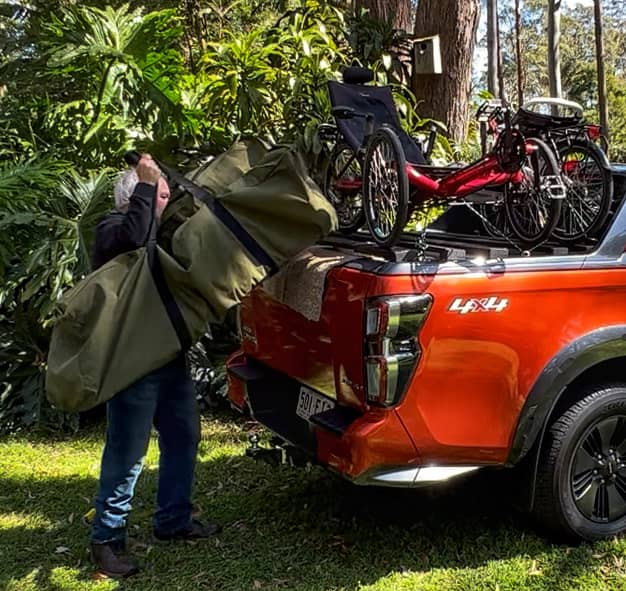
21st-century utes are migrating from sedans with tonneau to an SUV with a tub or flatbed tray. It means the trikes are loaded much higher off the ground – needing a longer ramp.
For this exercise, I assume the trikes are on top of a tub packed with travelling gear. Most utes, unlike the larger American pickups, have a tub too short for the 2 metres (6′) plus required for a trike.
There are or will be articles for carrying trikes on sedans, station wagons and SUVs.
Ute Variations
- Many utilities come fitted with a roller cover. The tracks provide support for above-tub accessories such as cross-bars. I use wooden support rails for the trike wheels to allow the roller cover to open. I can take two trikes and still pack the tub with all the gear I want for long-distance travelling. In theory, I could take four trikes with two more on top of the roof – but that would be just plain greedy.
- Some owners put a canopy on the tub for even more space. Trikes mount in the same manner as for any SUV.
- Trades-people and others prefer a ute with a flatbed tray. The tray is nearly as high as the top of a tub.
- Going back to tub covers:
- The traditional tonneau cover was heavy-duty vinyl held with tie-downs along all sides. The trike supports can be long enough to fit over the tub. It might be easiest to load the trikes from the side and directly onto the supports. When carrying one trike, load it towards the front for better access to the contents of the tonneau.
- An open tonneau is rare, but the support rails work as well.
- Trifold solid covers do not require support rails for the trike wheels. If you mount a single trike east-west, you can still open the first trifold.
- Solid covers are the most limiting. In some cases, you cannot even access the rear. Tie your trikes to the roof as you would do for any SUV.


Components
Tie-Down Points

The Isuzu manual roller cover has T-slots on each side. The problem is that these slots are narrower than those on roof rack cross-bars. Fortunately, standard M6 cup head bolts do the trick. The square locking part is small, but the M8 bolts are too big. Combining the m6 cup head bolts, provided nuts, and M6 eye nuts provides adequate, if not pretty tie-down points.
Trike Support

Roller covers are strong enough to hold the trike, but I want to open the top to retrieve travel gear. I used cheap and sturdy treated pine decking as support rails to reach this goal. The highest cost was the paint. I cut some short pieces to raise the wood above the cover handle and then protected each end with adhesive foam rubber.
Loading One Trike
Using this technique, I can load my trike ready for travel in less than 7 minutes.
Introducing the Ramp

After many prototypes, I have built two acceptable ramp versions. The one pictured here is my go-to ramp. Each ramp is 1.6mm (63 thou/mil) thick aluminium extrusion, 1.5m (5′) long, 100mm (4″) wide with 50mm (2″) sides. Two pieces are hinged together to give a 3m (10′) ramp.
My previous attempt used 3mm (120 thou/mil) extrusions as three pieces of 1m (3′) clipped together. It is sturdier but heavier to carry around. It is also more challenging to build.
Side Loading vs Rear Loading

Side-loading is a little more convenient because you can roll the trike directly onto the support rails. It is also the only option when towing a van. On the downside, loading two trikes are more complicated.
Rear loading works well for two trikes. It is also the only option if parked nose or rear-in with vehicles on either side.
Running Up the Ramp

Lift the rear wheel and guide the front ones up the ramp. Loading is effortless for any platform up to shoulder height. Remove any heavy bags or batteries. Oh, and don’t forget to take down any flags, as they may get broken in underground car parks.
Tying Down the Wheels

We will lock the trikes down with ratchet straps, but they can still move sideways. I use Grunt Versa straps to hold the wheels to the support rails. One strap alone will stop the trike from rolling if the platform is on an angle. Strapping one front and the rear wheel is adequate.
Tying Down the Ramps for Travel

Fold the ramps and slide them under the trike but on the support boards. A couple of longer Grunt Versa straps will hold them down. Rubberised straps will stop the ramps from sliding out. Strap the rear, then drag the ramps to one side at the front. As well as making it easier to reach the front, it tightens the rear strap.
Ratchet Down until the Wheels Move

Wheel straps hold the trike in place but are not good enough for travel. I prefer these spring-loaded ratchet straps – one each for the front and rear. Place one around the seat or chassis and tighten it until the trike starts to move.
Locking the Trike in Place

Place the second strap around the front wheel tee and tighten it until you can see the wheels compress a little. The two straps pull against each other, suspending and locking down the trike.
Unloading a Single Trike
Unloading is even quicker at 4 minutes. It would be faster still if you could lift the trike down, but doing so risks back injury.
Preparing Ramps (Side Load)

Consider space for the ramps when you park. Either side or rear positions work.
Remove Wheel Retaining Straps

There is no good reason to remove the straps first. My bad. It would be best to leave one strap on until last if your car sits on a camber.
Remove Ratchet Straps

Be careful not to damage yourself, your car or your trike. Old ratchet straps can be difficult to release. I try and choose ones with as much protection from raw metal as possible.
Wheel Your Trike Down

Line the front wheels with the ramps. The rest is a doddle thanks to the 50mm (2″) sides.
Slip the Ramps Under Your Car

Slip the ramps under your car if there is no room in the tub. I have not had ramps stolen – to date.
Loading Two Trikes
In this video, the loading of two trikes takes 12 minutes. As expected, this is slightly less per trike than a single load.
Only Five Supporting Rails are Required

The front wheel of the foremost trike sits on the case of the roller cover. For other ute covers, you will need the sixth rail.
Rear Loading for Two Trikes

The two trikes need to fit together – one in each direction. Side loading is possible but will require much juggling to run the second trike up. The ramp must be on the opposite side for the second trike. Loading a trike backwards is more than awkward – it is a downright pain.
Measure the Width Between Ramps

We can use the distance between the support boards when side-loading to set the ramps. We need another way of estimating to load from the rear. I have a strip of aluminium flyscreen frame stuck to the side of a ramp with hook and loop.
Load the first trike

Juggle the trike until it is as far forward as possible. There is only just enough room on a dual cab utility. Space cabs, single cabs and American ‘trucks’ are less of a problem.
Lift Trike Wheels onto Support Rails

Fortunately, recumbent trikes are not too heavy since we need to lift the wheels onto the support rails.
Load Second Trike

Turn it to face in the opposite direction to the first trike. The aim will be to have the trikes fit together like two matching jigsaw puzzle pieces.
Squeeze Them Together

To fit in the top of the ute tub, we will need to have the trikes very close together.
Strap the Wheels

We need fewer wheel straps with the two trikes holding each other in place. I strap down the rearmost front and back wheels of the rear trike.
Ratchet Strap both Trikes Down

I strap the front wheel supports of both trikes. It is enough because the trikes are entangled.
Unloading Two Trikes
Both trikes unload in less than 5 minutes. It is hardly more time than needed for a single unit.
Undo All the Straps

It is pretty safe to remove all straps as the trikes will not roll while in each other’s way.
Unload the First Trike

Lifting and moving it sideways may be necessary to disentangle the two trikes.
Conclusion
I can only describe one of many variations on utility vehicles. Please add your own experiences in the comments below.