Recumbent tadpole trikes are awkward to transport. It would be nice if we could go anywhere with minimal inconvenience for our rides while using the vehicle that most suits our other activities. The trike should not take up the space we need for our trips. It seems to me that the roof provides unused space. Manual lifting is for the young and robust. So, a ramp is needed. I spent a lot of time experimenting with wood – but it was not up to the task. The final result uses extruded aluminium. Later articles will show it for a town car, station wagon, SUV and a Ute/truck.
What are We Doing?
Building a ramp is slightly more complex than finding two channels long and robust enough. Each end needs stabilisers to stop the ramp from rolling over if the trike wheels are not in the centre. A stabiliser is foot long bar. Being able to space the ramps consistently makes loading much more straightforward.
Ramp Material
I chose to build my ramp from aluminium. Besides the apparent benefit of lightness, it also has fewer sharp edges. The Aluminium Warehouse have channels for $75 (Australian dollars) per 2-metre length. By going to my local supplier, Toowoomba Metal Centre, I paid about AUD 50 a track which is currently USD 35.
If you don’t have convenient access to a specialist, you might be able to use something from your local hardware. Out local super-hardware, Bunnings has fence rails and sleeper supports. The fence rails are 5kg, each being only 1.6 gauge. The shape creates the strength needed, but the thin material makes it easier to cut yourself. It is OK for the ramp as they won’t damage tires. The sleeper supports weigh nearly 13kg each.
Video
0:01 Ramp Channel Size

I create ramps of 2 metres (6 feet) long. 1.6 metres (5 feet) would be adequate for use on a sedan or station wagon. 2 metres is a bit short for an SUV or utility truck, but any longer is harder to store and transport.
A narrow channel makes it difficult to align the trike wheels. It is also challenging to keep vertical. At 100mm to 4 inches, it becomes manageable. If the sides are too shallow, the trike can jump out. 50mm or 2 inches seems to work well. The material must be thick enough to keep it from twisting or bending. Here I use 3mm (1/8″).
0:24 Centre Punch Rivet Location

This design needs stabilisers on top and bottom. The safest solution is to rivet 300mm (12″) by 20mm (3/4″) by 6mm (1/4″) stabilisers perpendicular to the channels. The rivets will not interfere with the tires.
I do not like these sprung automatic centre punches. Give me an old-fashioned manual punch with a hammer any time.
0:53 Drilling holes for the stabiliser

Drilling this close to the corner requires an angle. Fortunately, rivets expand enough to cover the slight elongation. I could have turned the channel over, but then I would be drilling close to an edge which can also cause difficulties.
1:56 Marking stabiliser hole locations

I mark and drill both holes in the stabiliser. If this is not accurate enough, there is a risk that both rivets cannot be inserted. Another option would be to drill one hole and do the second after the first rivet is expanded. I find that more fiddly.
2:35 Drilling the holes in the stabiliser

At 6mm, the stabilisers are twice as thick as the channel. It is surprising how much more difficult drilling a hole becomes. If I did not decide to work outside to give you a good background, then I could have used my stand drill. I used a grinder to take off any sharp edges at the ends of the stabiliser.
3:00 Riveting Stabiliser to the Channel

I have chosen to turn over the channel and rivet from the back. The face of the rivet has a low profile that will not poke through any padding to damage your delicate car. The other end of the rivet, unlike a screw, does not have a sharp point. Because we chose to position them close to the outside, they will not obstruct the trike wheel as it passes.
3:39 With care, the rivets will align

This procedure’s most challenging part is ensuring the holes in the channel and stabiliser align. Fortunately, rivets are forgiving. Lengthening the hole a little does not cause problems. As an alternative, drill and rivet one side before drilling both pieces of material together for the other side.
4:10 Padding on the channel for ute loading

I use a reasonably dense foam with a seal-adhesive back. We only need to cover the channel’s top for tub or tray-backed utes. There are examples in the relevant articles. Later we will pad the side to protect your trike when tying down the ramp for travel.
4:42 Padding to the stabiliser for hood/bonnet

We will need to pad the stabiliser for all vehicles, especially those where we will be rolling the trike from the ground and over the hood/bonnet or trunk/boot.
5:10 Loop with Contact for Stabiliser Padding

Most bonnets are higher in the centre. We can keep the ramp stable by padding the outside using multiple layers of contact padding. The hook and loop mean we can remove the extra padding when we don’t need it.
5:24 Adding hook h&l for spacing straps between channels

Apply contact hook to one side of the stabilisers with channel up. We will be stringing some double-sided hook and loop between the tracks to provide spacing between the channels. Alternatively, you can drill a hole in the stabiliser and use a cord to allow spacing. It would be easier but does not allow for different tracks on different trikes.
6:06 Loop H&L for bonnet pad when not in use

Apply some contact loop to the stabiliser on the opposite side to the contact hook above. It will hold the bonnet pad when not in use. A bonnet pad is necessary when using the ramp on a bonnet that is not flat (as in most cars and wagons). It is not needed for trays or tubs on utilities.
7:11 Positioning stabiliser to mark holes for rivets

Next is the bottom stabiliser. As you can imagine, it will be crucial for the holes in the channel to line up with the holes in the stabiliser. It is easy given the margin for error that an expanding rivet gives us.
7:32 Drilling the holes in the stabiliser

For fun, I am marking the stabiliser using the drill through the original channel holes. It works out much easier and more accurate than using a centre punch.
8:28 Locking a blind rivet

We need to use large rivets for their strength. Even though they are aluminium, I found them challenging to activate with a hand tool. The solution is to use an adapter for my cordless drill. Amazon has a selection. The significant mechanical advantage makes the job a doddle.
8:49 Use Your Trike to set Ramp Spacing

I found it more comforting to use the trike to place the channels the correct distance apart. Use measurements if you wish. Be warned, the Greenspeed trikes have wheels that are not vertical. Measure the bottom, not the top. And in call cases, make sure the steering is straight ahead. Spacing will change even with the wheels even slightly off centre.
8:59 Mark White H&L for Wheel Spacing

Did you notice I used white contact hook tape on the stabilisers? It was part of my cunning plan. Once you have cut the strapping between channels to size and attached it to the white contact hook, you have spacing for one trike. By marking the location, you can change it for trikes with different wheelbases. Most trikes have close enough spacing to use the same strap location.
10:20 Overlap adjustable strap ends to increase lock-down

Hook and loop has good horizontal adhesion. Not so the vertical. By placing fixed tape over the top, we reduce the problems with the tape coming loose during transport.
10:57 Use cable ties to lock down the non-adjustable strap segment

The contact glue has its limits when used on aluminium. Even the high-quality product produced by Velcro is not quite enough. I use cable ties to encourage it to stay in place. The setup has worked so far.
The ramp is ready for use

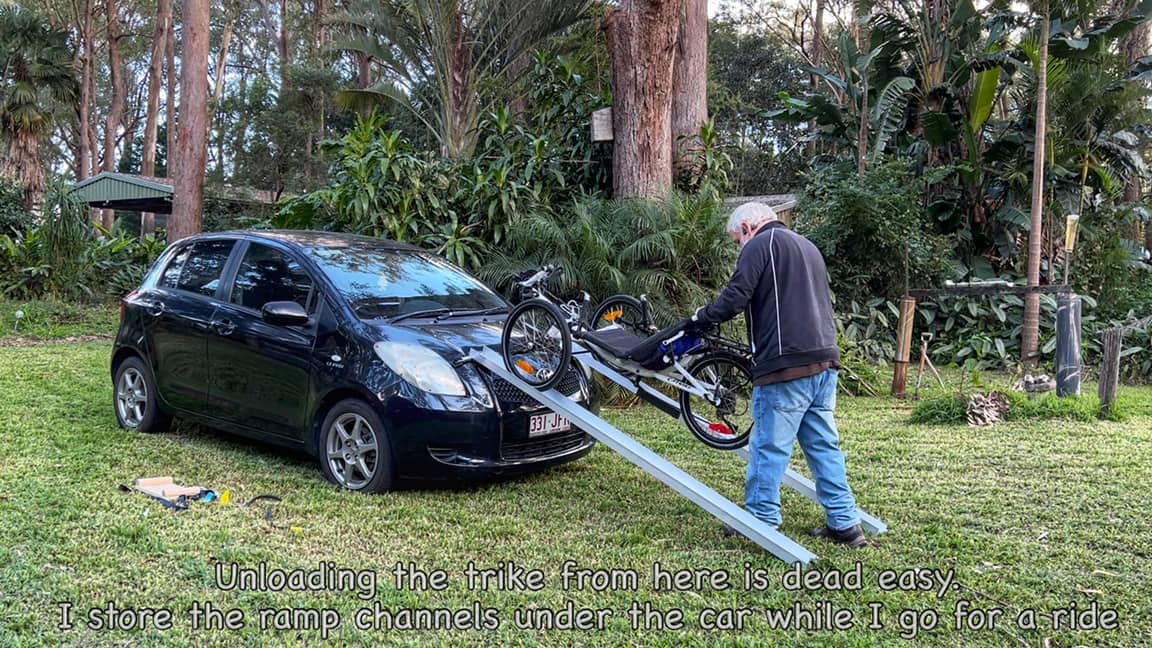
S The next step is to show the ramp in use. The first car off the rank will be a Toyota Y’ris, an example of a city car – proving that you can travel with a trike even with the most miniature vehicles. I will also write articles on using the ramp to load two trikes on the tub of a ute and the roof of a station wagon. When I can, I will use the ramp on an SUV/4WD as they are the most challenging of cases.
Travelling with the DIY Ramp

A ramp between 6 feet and 2 metres in length won’t fit on the back seat. As it is a similar length to a trike, that is where I put it. I use a bungee cord to hold it to the rear rack while supporting it on the cross-bar for the front wheels. For the Catrike Villager with pedal extenders, it fits neatly as long as it is strapped high on the rack. We have a problem if the channels overlap the pedals. When we wheel the trike backwards, the pedals turn. The ramp may dislodge. Alternatively, the rear wheel will stop rotating. The latter is preferable, so ensure the pedal is below the ramp.
In Conclusion
This approach works for me. I was seeking the easiest way to take my trike with the least effort, loading and unloading. I have tried many techniques and scoured the Internet for more. Let me know what works for you in the comments below—meanwhile, happy triking.
Since writing this article I have created two other variants referenced here. Both are 3 metres (10’) to cater for utes and SUVs.